Thursday, October 12, 2017

New Home Project

Note to Self: 

Even a small project can take a large amount of work!


Once upon a time, I decided to take on a new project. Because we definitely didn't already have enough projects in our fixer upper house we just purchased and moved into. *insert eyeroll*

Yes, you read that right! We just bought our first home and it's been quite the adventure so far!

The truth is there are a lot of projects. We knew there would be when we decide to invest in this home, but every once in awhile I can't help but think, "Why didn't I push harder to purchase that cute, little, newly renovated, yellow house??" Don't get me wrong, I love this house! But if there's one thing I've learned in the last month and a half of homeownership, it's that every project has 3 characteristics, they:

Are more difficult than anticipated
 Cost more than you originally planned
Take more time than you could imagine

That being said, I got to the point where I was kind of DONE with the big house projects. So I decided to take on (what I thought would be) a smaller, more manageable project (cue the drum roll): 

SCRABBLE WALL ART

I had seen it before and thought it would be so fun to incorporate one into the collage wall I was working through in my mind. So, I set to work! 

STEP 1: Design

This step took the longest for me because I am extremely indecisive and this step involves a lot of decision making. First of which is what words/names to use. I decided to do our family's names (McKenna, Stefen, Tib, & Pepper) and then also the word "family."

Tib and Pepper are our two yorkies - aren't they adorable? 


Once you've picked your words, it's time to figure out the layout! The easiest way, I found, is to use an online crossword puzzle maker. Most of them you can just put the words in and then re-run the program multiple times to give you different layouts to choose from. I ended up using a couple different websites (linked below) because each one tends to get stuck in the same few patterns. There are a ton of other options for websites as well! 

After the programs had created some layouts, I used photoshop to add the letters back in because I'm a super visual person and I needed to see it. Here's what a few looked like after the fact: 


And here's some examples after I got scared to make a decision and instead decided to procrastinate by using photoshop to put real scrabble tiles into those layouts haha: 


(Side note: Tiberius is Tib's full name)

After showing my husband a few layouts and asking for this opinion, he said he liked the tallest one (left on the above picture) the best. I liked it too, so I moved forward! 

STEP 2: Get materials

Here's a quick list of materials I used (I'll go over reach of them a bit more when I get to the step I used them in): 
  • 1/4" x 4" x 48" wood 
  • Ruler/measuring tape
  • Level
  • Pencil
  • Wood Stain
  • Polyurethane
  • Paper/stencils
  • Paint brushes/toothpick
  • Saw
  • Sandpaper 
The wood for the project was easier to find than I expected. I looked at a craft store, but they didn't have the size I wanted and it was all expensive. So I headed over to Home Depot (aka: my home away from home right now) and found some wood boards that would be perfect. The sign said they were 1/4" x 4" x 48", but when I got them home and looked more closely, the tag actually said it was 3.5" wide (which ended up working better!) These boards were $4.95 each and I needed 3 to have enough squares for my project and a couple extra for oopsies. 


STEP 3: Measure & Cut

The first part is easy - whatever width your board is, measure that same distance along the length of the board and trace out the lines to cut your squares. I used a carpenter square (that's what they're called, right?) but a ruler would work too! 


After I drew the lines it was time to cut the squares! Thankfully our friend was letting us borrow his saw for a couple other house projects so we already had one to use. If you don't have one, you could rent one or just cut the pieces at home depot! I enlisted my husband's help to show me how to use the one we had and he helped cut some of the boards as well. 


STEP 4: Sanding

We had some fancy sanding blocks from some other projects, but just sandpaper will work as well. You just want to make sure the edges and surfaces are smooth and even. I'm not the most patient individual so I sped through this step and I'll admit my "squares" could look better than they do haha! 


STEP 5: Stain

The hardest part about this step was deciding what color stain to get! I ended up getting Minwax Weathered Oak. An 8 oz container cost about $5 - and I had a ton left! So make sure you pick a stain that you'll want to use on something else. Staining itself is easy, just follow the instructions on the can! One thing I struggled with is that not every piece is going to stain the same - they all look quite different. Which is great for art, but hard for a perfectionist's mind. Here's all of them together after I stained them:


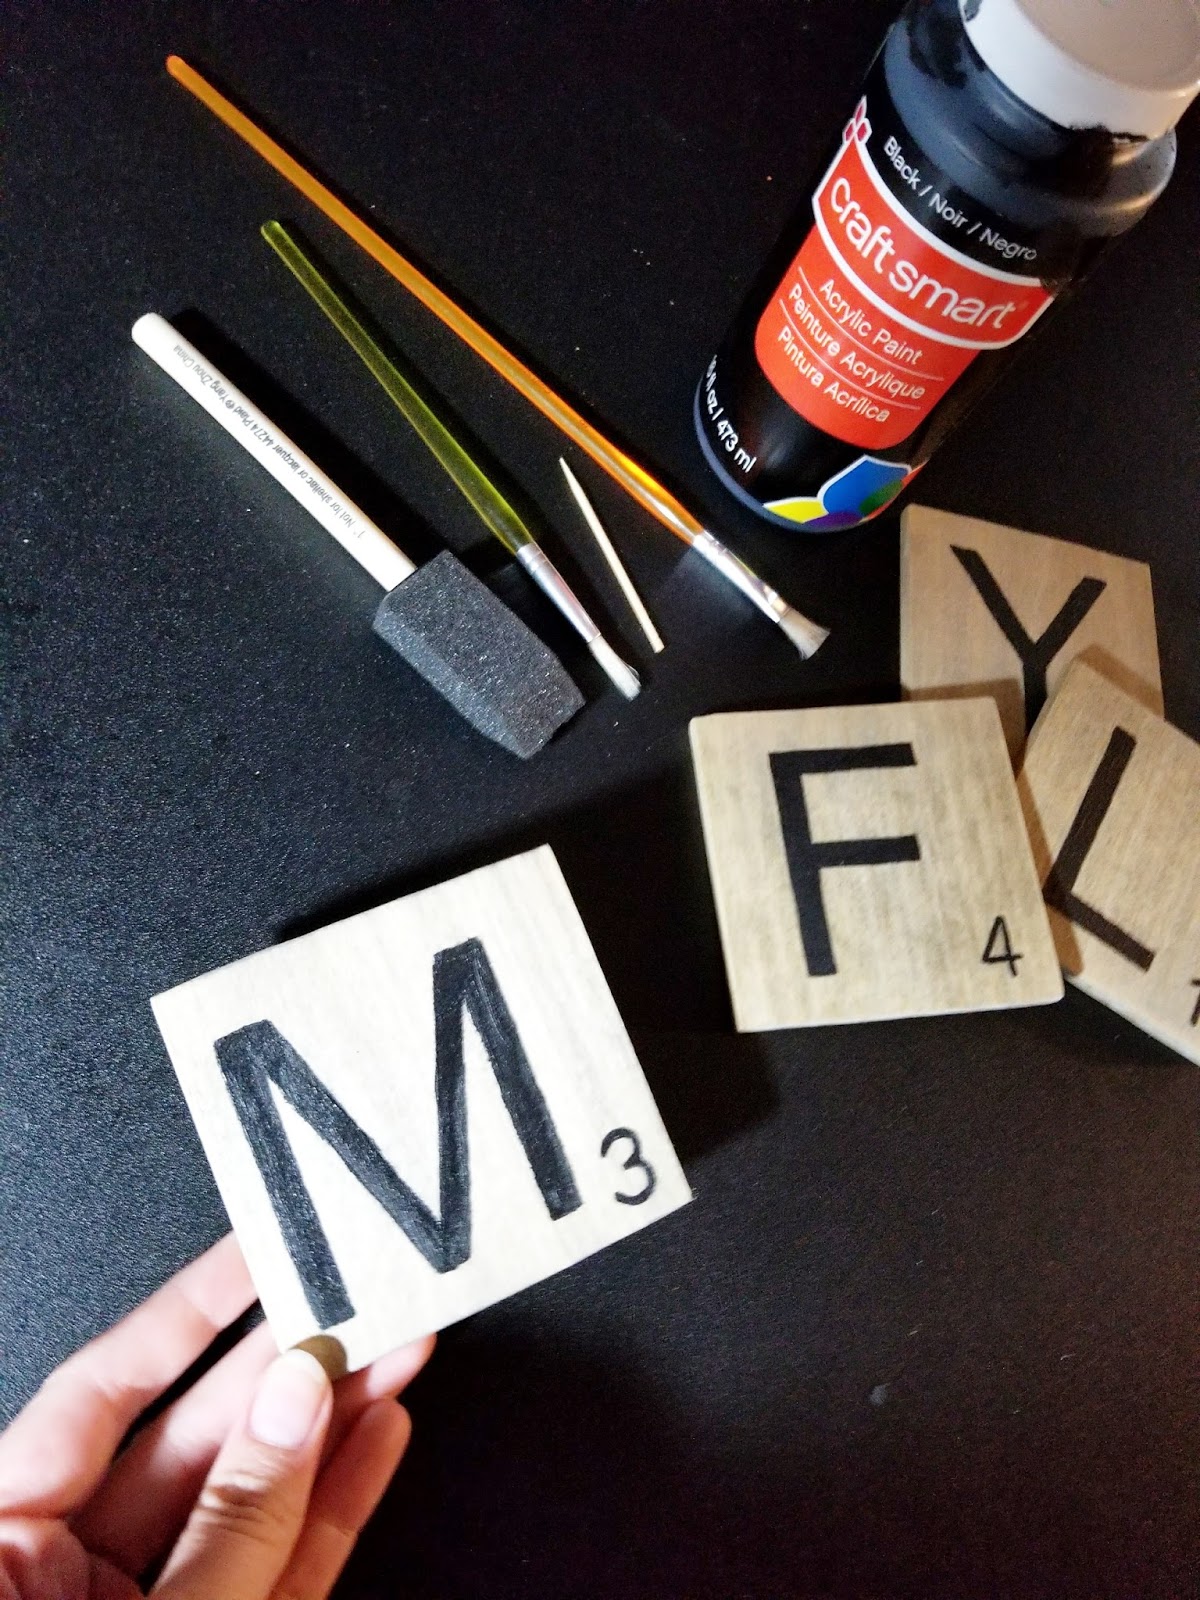
STEP 6: Trace & Paint Letters

I had a hard time deciding how to do this next step because I wanted my tiles to look like real scrabble tiles, but I also wanted the process to be fairly easy. There are letter stencils you can get, but I didn't like the font. There are letter stickers as well, but I didn't like any of the sizes. So I decided to go with the good old tracing and painting method haha. 

First you have to decide on a font and print out the letters/numbers you'll need in the size you want them. I used Arial font, size 250 (letters) and 65 (numbers). 

When you have them printed out, trace the letters onto the backside of the paper with a pencil, making sure to make the mark dark (lots of lead dust - I use super technical terms if you couldn't tell). 


Cut out the letters and numbers and gather your tiles together. Make sure you know how many of each letter you'll need and also what number goes with each before you do this next step!

Put the pieces pencil side down on the wood tiles, then trace over the edges of the letter. This will transfer the markings to the wood (very lightly) so you know where to paint! 


I used black acrylic paint to fill in the letters/numbers. This was probably the most frustrating part of the project because I didn't have great brushes (I just used what I could find in my old craft supplies). Because of this, I had to use toothpicks to help with a lot of the edges and details. 


STEP 6: Polyurethane finish

After all the paint dries, it's time to finish them off with a polyurethane spray! I used the one pictured below (about $7), but Home Depot has lots to choose from. I picked this one in particular because I like the satin finish more than glossy and this was one of the least expensive options. Like with the stain, just follow the directions on the can and you'll be good as gold! 


QUICK SIDE NOTE:
Along the way, I laid out the tiles and discovered that the layout we chose was actually too tall for where we wanted to put it on the wall - I almost cried! So instead of the taller layout, we just kind of turned that one on it's side and went with a wider design.


STEP 7: Hanging the pieces

During my prep for this project, I found lots of different ways to put together and hang the letters. Some people connected them on the back with wire/tape, others attached them to a board and hung that on the wall. I decided I wanted each of the letters to be separate so that in the future I could move the letters around as we have kids - or just get more dogs ;) haha

The way I decided to hang these letters separately involved using command strips (the velcro ones). Now, I'm pretty cheap and I like to keep my projects as inexpensive as possible. SO I bought a 16 set pack of small command strips and then cut them in half to double them! This wouldn't work for all projects, but since each letter tile wasn't very heavy, it worked well for this. You just have to make sure you cut them in half like a hotdog instead of a hamburger (y'all know what I'm talking about). After you cut them, put the two velcro pieces together and now you have one set to use! 
Here's a picture: 


Once you have all your command strips cut and put together, it's time to attach them to your letters. The easiest way is to take off the plastic part on one side, stick it to the tile, and leave the other plastic piece on until you're going to place it on the wall. 


Once you have all your tiles ready to go, just slap them on the wall! Ta-da! 

. . . 

Just kidding ;) If you're anything like me you're going to need them to be perfectly straight or you'll lose you're mind every time you see it! To make sure the tiles were straight, I used a tape measure, pencil, level, and painters tape. 

First I measured to find the middle of the wall, made a couple marks using the level, and then placed painters tape in a straight line across the wall. Next I figured out which letter was the middle of my design and put that one on the wall first, using the painters tape as my guide. 


After that I finished out the letters along that same line before moving the tape and measuring/marking for the next line. As far as the space between tiles, I just eyeballed it - I was way too anxious to see the finished product to take the time to measure!

Afterward I measured and the gaps were about 1/4 inch. If I did it over, I probably would have made these gaps larger! Close up the gaps look fine, but from far away the tiles look like they're touching. 

STEP 8: Sit back and enjoy your work!

That's all, folks!


There is actually one more step for me - I'll be making a collage wall with some pictures and quotes too. So that's what I'm working on now! But until that's done, I'm just happy seeing this up on our previously empty wall and knowing that I did this project from start to finish!

This was such a fun project and I'm glad I took the time away from the stresses of homeownership to do this!


I hope you enjoyed my tutorial! If you have any questions feel free to email me! And if you make you're own scrabble wall art I'd love to see it!

Thanks everyone!

Monday, January 9, 2017

10 Things I Learned in my First Semester of Grad School

Note to Self: 

Grad school isn't all it's cracked up to be - but at the same time it's so much more. 


About three weeks ago, I finished my first semester in grad school! I started my school counseling masters program at USU and you could say I'm pretty excited about it.

I've been dreaming about going to grad school for years. Wondering what I'd do, what it would be like, what I'd learn. Worrying about where I'd go, if I'd make the right decision, and if I could handle it. The truth is that grad school, so far, is nothing like what I expected. In some ways it's worse, but in many ways it's better.

Here's my cheesy "first day of school" pic.

So, now that I've finished my first semester and have all this "insight" (haha), I decided to sit down and do what so many others have: make a "10 things I learned in my first semester of grad school" post.

1) Grad school isn't a competition 
Before I got into my program, I had multiple anxiety attacks about whether or not I would be good enough. I knew that my 3.9 GPA, good GRE score, experience, etc. would not make me unique among the students in my program. I knew that would be the average. I worried about proving myself and didn't want to be at the "bottom" of my cohort. There were days I didn't even want to apply for fear that I wouldn't make the cut. The truth is, grad school isn't a competition. I'm in a cohort of 37 students. That's 36 other people who are working towards the same goal and going through many of the same struggles as I am. Basically, you have to remember that you are definitely not alone. I have never felt more at home in a group of people. Maybe I got lucky - but we all have this cheesy, high school musical, "we're all in this together" type of feel (at least I think so). If someone records or types out the lecture, we share it. We have a Facebook group where we can all talk, help, and encourage each other. Since day one it's felt like the farthest thing from a competition and I'm so grateful for that. I can already tell that some of these people will be life-long friends and that we'll all help each other out throughout our careers.

2) Grades don't matter like they did in your undergrad
I've always been a straight A student. Once you get into grad school, the majority of the students around you were straight A students. So imagine our dismay when we took our first quiz and the average was a 78%! Grad school is hard. After the first week I started to worry, again, if I had what it took to get through. I began to give up on getting A's, but still hoped that I would and worked for it. I think it took nearly the entire semester for the majority of us to wrap our heads around the fact that not getting an A is OK. To move on in our program, we need to get B's in our courses. Throughout the semester, I can't tell you how many times I heard something along the lines of "It'll be OK... we only need to get a B" through deep breaths. The professors don't want you to fail, either. No matter how much individual professors may make you question this. They want you to succeed and most are willing to help you in any way they can. Stressing about the difference between a B and an A is simply not worth it. No one is going to look at your transcripts after you graduate and say "Oh dear, she only got a B - let's hire someone else." Getting through the program and earning your degree is good enough.

3) There's more reading than you ever imagined possible 
Even though my graduate program is only part time (2 classes, 6 credits), I had more reading each week than I did in my undergrad with 5 classes. And I've heard that next semester's classes are even more reading intensive! If you didn't learn how to skim and grasp the main points in your undergrad, the first semester of grad school is the time to learn. It's also important to learn how to research a topic in depth. I read more research articles this semester than I did my entire undergrad (even with my research methods class). You'll learn a lot - but don't underestimate the time it takes to do so!

 4) Plan ahead - turn in assignments early
This one is hard to learn! I had spurts of time during the semester where I got ahead by planning and turning things in early, and other times when I was turning things in moments before they were due. The first option is always better. Our big assignment was due while I was scheduled to be on vacation so I finished it and turned it in the night before we left. It was such a relief to have it done! I wish I had been more productive and turned in the majority of my assignments early. The end of the semester is so much more manageable if you turn most of your assignments in beforehand. You'll thank yourself for it and your professors will thank you too.

5) Organization is key
I don't know how I ever survived without my Plum Paper planner (or any planner for that matter). Staying organized in grad school is more important than ever! Keeping track of all of the readings, papers, quizzes, exams, etc. can feel overwhelming. Looking over the syllabi that first night of class was so intimidating! I spent that first weekend writing out everything in my planner and it helped me get through the semester without too many breakdowns ;) - really it helped a TON. You don't have to purchase a customized planner if you don't want to (I just can't help myself), but investing in some kind of planner is definitely worth it! Figure out what works best for you and do it.

6) Grad school has to be a priority
Grad school is going to take up a ton of your time - there's no getting around it. Our program director gave us two pieces of advice during orientation. The first was: you have to be willing to set aside time for school and make it a priority. Everyone in my life knows that for the next two years they better not plan anything for Thursday nights, because I have class and will not be able to make it. I came to terms with the fact that my husband and I would no longer be able to hit up B-dubs for boneless wing Thursday (heartbreaking). I also accepted the fact that even though we have cable now, I would still have to watch Grey's Anatomy on Fridays. Those might be little sacrifices, but in all seriousness, you are going to have to make sacrifices for grad school. But it will be worth it. (At least that's what they keep telling me!)

7) Veggies and the gym are important 
The second piece of advice our director gave us was: eat vegetables. No joke. We all laughed at the time, but it's so true. During those psychometrics study sessions it was so hard not to eat a whole bag of chocolate covered cinnamon bears instead of some carrots and celery. Many professors won't mind if you snack during classes (especially long ones) so take the time to plan out a healthy (preferably quiet) snack, instead of just picking up a bag of chips on your way out the door. If you don't take care of yourself, you'll be amazed at how quickly your health can go downhill when you're busy and stressed about school. So eat your vegetables. And go to the gym.

8) It's serious - but not THAT serious
Grad school is serious. It's bigger than your undergrad and it determines what you'll do next. However, it's not so serious that you can't laugh your way through it and even ENJOY it. That first semester was hard. I have to say, though... I am ecstatic for this next semester to start. I'm excited to learn more about what I want to do with my life. I'm glad I'll get to see all of my friends again every Thursday night. I want to enjoy grad school while I'm in it, instead of just looking back and thinking, "Wow, that was really a great time."

9) Give yourself a break
Most people in grad school aren't only in grad school. I've got a full time job that also requires many service hours, a husband, a puppy, etc. Whatever it is you're doing alongside grad school, it's likely that you'll have times when you feel overwhelmed. I know I have and it's only been one semester! That's why it's so important to give yourself a break. And by that I mean two things: 1) give yourself a break when you're not able to do it all (you're still doing great!) and 2) give yourself the time to take a break every once in a while. You'll thank yourself for both.

10) It's going to be OK
I think this one is the most important - and something that I needed to hear often throughout the last semester. It's going to be OK. If you put in the time and the effort, you are going to be ok. You have to work and it's not going to be easy - but you didn't get into grad school on a whim. You have what it takes! So on those really hard days, look in the mirror and tell yourself that it's going to be OK. Get together with other students in your program and remind each other that it's going to be OK. Because it will be. Somehow you'll make it happen; you'll finish all of your assignments, you'll pass your classes, and before you know it you'll be onto the next semester.


Hope you enjoyed my awesome, not so original, 10 things I learned post! ;)

Now go out there and rock your grad program!


Monday, January 2, 2017

One Little Word - 2017

Note to Self:


These one little words mean more than you ever realized. 


A few years ago I came across a blog that gave me the idea of doing One Little Word (OLW). The idea is that instead of making "resolutions," you choose one word to focus on throughout the year. In the past I've done words such as "courage" and "commit." Last year I chose the word "believe."

Before I get into which word I've chosen this year, I want to do a little recap on 2016 and my OLW "believe."

If you would have asked me yesterday if I had learned a lot from my one little word for 2016, I would have probably said no. In fact, I know I would have said no. I was thinking about it as the year came to a close - thinking about the fact that I didn't focus on my OLW very much at all. I was actually quite upset about it for a minute, and promised myself that I would do better this year.

Then, in preparation for this post, I went back to my 2016 OLW blog post. Last January, I wrote this about my word "believe":


"I know that 2016 has great things in store, but I know that it will be difficult . . . but it will be worth it. This year I'm going to believe in myself and my potential. I'm going to believe in God and his plan for me. I'm going to believe in my family. I'm going to believe in my business and my education. I am so excited for this year!


"As I said, I'm sure I have only the smallest idea of what 'believe' will mean to me by the end of 2016 . . . but I do know that this is the word I am supposed to focus on this year. I know that it will get me through the hard times and over the hills that I will have to climb. " 

When I read this, moments ago, tears came to my eyes. "Believe" meant so much more to me during 2016 than I ever realized. I went through many trials that I know would not have been possible without believing in myself and God. I believed in my family and I'm in a much better place with each one of them than I was this time last year. I believed in my business and even though I've placed it on the back burner the last few months, it has remained a constant. 

Most of all I believed in my potential and my education. 

Many of you may not know, but I wasn't supposed to graduate with my bachelors this past summer. When I think of 2017, I still think of it as "the year I'll graduate," because that was always the plan. Around this time last year, however, I discovered a way that I could possibly graduate a year early and start my graduate program a year early as well. It was terrifying and difficult. There were days I wanted to quit (mostly the days that consisted of studying for the GRE and the days I had to ask for letters of recommendation). But I believed in myself. More than I think I ever have. I believed in God and the fact that his plan for me was different than my own. And I did it. I graduated Summa cum laude from WSU during Summer 2016 and started my masters program at USU, Fall 2016. That's not to broast - it's to show the difference that believing in yourself can truly make. 


I'm so thankful that I chose "believe" as my one little word for 2016! Even if I didn't realize it along the way, it had a lasting effect on me.  

NOW! Onto 2017! 

I almost didn't have to think about what word I would chose this year. I even debated choosing this word for 2016, but I'm glad I didn't. I needed 2016 to teach me what this word really meant and how I could apply it to my life this year. 

My One Little Word for 2017 is: 


I am so excited to focus on the word "adventure" throughout 2017! 

Adventure - noun: an unusual or exciting experience or activity; participation in exciting undertakings or enterprises. 

I said I needed 2016 to teach me what this word is really about - let me explain. 

When I first think of the word "adventure," I think of all of the trips we went on this last year... 


Trips to Jackson Hole, Seattle, Spokane, Provo, Logan, Los Angeles, Hogwarts, etc. 

But that's not all that this word means. When I really sit and think about the adventures we had during the last year, I think of the day to day things. The trips to the grocery store. Getting lost on our way somewhere. Exploring our neighborhood. Trying a new recipe or new restaurant. Dying my hair a new and exciting color. 

Adventures don't have to be grand trips or experiences. 

That's why I'm so excited to focus on this word for 2017. Not only am I excited for any big trips that we may go on, I'm also looking forward to finding and creating daily adventures to make this year the best year yet. 


Have you ever done One Little Word? Would you like to join me this year? I'd love to hear what your words are and your experiences with them! 

Feel free to check out my first OLW post to learn more about where I first found OLW and where it started for me! http://notetoselfcollection.blogspot.com/2013/01/one-little-word-may-it-be-great-year.html